Hey folks!
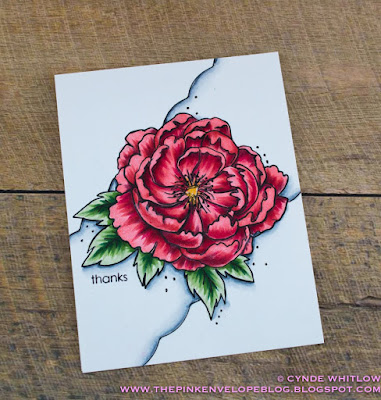
In today's video I'm sharing some really quick Copic coloring. I'm using the Studio Katia Japanese Peony Stamp Set. It's a large beautiful image that is excellent for something quick. It would be awesome for coloring practice and it would also be super fab watercolored or done with colored pencils! Enjoy!
In today's video I'm sharing some really quick Copic coloring. I'm using the Studio Katia Japanese Peony Stamp Set. It's a large beautiful image that is excellent for something quick. It would be awesome for coloring practice and it would also be super fab watercolored or done with colored pencils! Enjoy!
You can watch the video on how I made my cards HERE. You can also click on the thumbnail link below.
So the whole idea behind today's card was simply to color folks. I haven't been able to do that very much lately and when I feel like I need to regroup the best approach for me it to get back to the (my) basics. I stamp and image, color it in, throw on a faux frame and call it a day.
I stamped the JAPANESE PEONY from Studio Katia on Neenah SOLAR WHITE Cardstock with Altenew PERMANENT BLACK Ink. I love this ink! I've used it a couple of times in the past and I definitely need to start using it more!
I did use my MISTI Stamping Tool because this is a large stamp and also I wanted to make sure that my lines were nice and solid.
I have my color choices listed in the thumbnail links below and I talk about them more in the VIDEO. I store my most frequently used Copic's in a Deflecto STACKABLE X Organizer. To pick out the colors for this, I literally just looked at the markers in the organizer and the first color that jumped out at me was what I went with. It was an R24 so I went with this blending family.
Although I kept all of the coloring simple and to the point, do be sure to check out the VIDEO. I talk more about how I colored in my images.
I wanted to add a little bit more detail to the finished card so I used the Wplus9 SCALLOP BORDER Die to make a faux border. I first traced it with a pencil to make sure it was even. Then I traced it again with a EK Success WRITING PEN.
To finish off my card, I added some Nuvo Aqua Shimmer CLEAR Glitter, some dots with a Sakura BLACK Gelly Roll Pen and I colored in the center of the flower with a YELLOW Gelly Roll Pen.
That's it!
I hope you enjoyed my card today! DISCOVER more projects on my Youtube Channel. Do be sure to subscribe if you haven't and also tap that notification bell so you don't miss any future videos. As always Thanks So Much for stopping by!
Until next time.
If you're interested in any of the products I've used, I have links (some affiliate links) throughout and at the end of the post. Click HERE to read my full disclosure policy.


What a gorgeous card, Cynde! Love your coloring, and I so love your faux die insets! Stunning! Hugs!
ReplyDelete